Showing posts with label hardwood. Show all posts

Tuesday, February 7, 2012

An Enless Supply of Flooring Stories

Looking over 2011, I only made one entry for the entire year. Considering how the year went, that's not a big surprise, but I have a lot to say, so I hope 2012 is the year of more writing.

To start the year off, I have been finishing up projects that I had started when I worked in Seattle, but could never find the time to complete. For a person like me, stacks of hardwood flooring and unused lumber that haven't been made into what I bought them for is depressing.

I guess I should say that it started a little before the end of 2011 to be exact. We moved all of the furniture out of our master bedroom and into the living room, but my grandmother passed away a day later. Since I co-signed on her condo, I was now the defacto owner and had to clean out all of her belongings, make repairs and find a renter before working on my home projects. So we lived in our living room for a month, but it is done now.

This is our bedroom closet:


This is our Master Bedroom with the finished floors:

The flooring in the bedrooms is a prefinished Birch hardwood, 3/4" thickness with 3&1/4" width. The grain on birch is much more intricate than Oak, which is the standard hard wood for flooring.

We waited until the holidays were over before starting the next room, the family room, which is on the opposite side of the house. This gave me time to find a great deal on a used flooring nailer. Up to this point I had been using my standard 16 gauge finish nailer. A standard finish nailer will secure the floors, but the straight, un-barbed nails are more likely to allow movement which generates sqeaking. Flooring nails are barbed with a big L top, and the flooring nailer attaches them with more than 11lbs of force, where my standard finish nailer generated a little over 3lbs of force. I avoided getting a flooring nailer for a long time because of the cost, but if I could go back and do it over, I would reconsider.

Lucky for me, the used flooring nailer cost me half the price of a new one and works just as well (air tools are awesome because they never wear out). The flooring on the other hand, I had purchased in the spring of 2011, I was just too busy to install it. The family room flooring is a 1/2" oak with a cherry stain. I didn't notice any significant difference installing the 1/2" instead of the 3/4" but theoretically it has probably shaved two or three decades of life expectancy off of the floors (oh darn). I don't think we'll be in this house, or possibly even alive by the time that becomes a problem, so I won't let it bother me.

This is a picture of the bar area adjacent to the family room just after I had finished installing new linoleum tiles the week that Coughlin was born:

Those tiles looked very nice for about a year and a half, but started peeling up shortly after that. I had re-attached many with ahesive, but always knew that they were a short-term solution. I had more than enough hardwood to include the bar area, so there was no question about it. I had to tear up an added layer of particle board to get to the sub floor, but that just made the removal of the linoleum easier.

I would only recommend using linoleum tiles if you are attaching them as a layer over an existing vinyl floor since (even though they are supposedly designed for this) they don't stay attached to primed particle board at all.

Here is the re-re-finished bar area flooring with the new hardwood:


I've been juggling a lot of projects and events, so I didn't get any pictures of this room before we moved back into it, but here is the finished family room with our stuff in it:
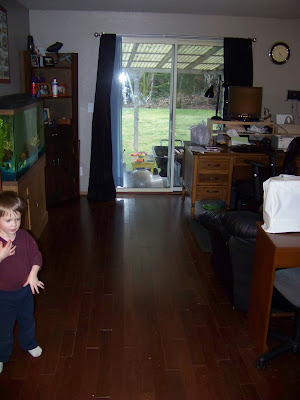
The only room left that needs hardwood is now the living room and dining area, which will require about 550 square feet of flooring to finish. All I have to do is find a deal on some pre-finished hardwood that I like and I will be finished with this nasty old carpet for good.

As a side note, a local flooring contractor installed new sheet vinyl in the kitchen and bathrooms for less than I would pay to buy new floors and install it myself, so once I finish the living room and our laundry room we will have new floors house-wide.

More to come I'm sure...

Thursday, August 26, 2010

A Good Price for Wood Floors

Because I can't sit still for more than a few minutes at a time, I've been working on installing hardwood floors in our Bedrooms. It all started a few weeks ago when I found a Craigslist ad for pre-finished birch hardwood for $2/square foot. Since our carpets are the original carpets for our 1989 home, and the original owners smoked a lot, I have been waiting a long time for this day to come.

The flooring outlet place we bought the wood from in West Bremerton had just about 500 square feet, which should be enough to do all three bedrooms and the hallway between them. Since I already had an air compressor, along with many other tools, all I needed was a finishing nailer and a lot of nails.

We started with Coughlin's room, which was in the worst shape since someone who stayed with us previously had some not-so potty trained dogs. Brandy removed the carpet, pad and tack strips and I pulled up most of the staples (they used an inordinate amount) and took out the trim as well as the closet doors.

Here are a couple of pictures showing the subflooring. Luckily, even though our home was built in the late 80's, we have solid plywood floors. I think it's 5/8th", but haven't done any drilling through to check. It doesn't sag and it's very solid, I am glad about this because it was a popular trend at the time to put in particle board, which is horrible.


All of the small yellow spongy looking spots represent a staple for the pad, they went really overboard.

After everything was removed, we put down 15lb asphalt paper (for roofing) to provide a moisture barrier and to improve the insulation, even if only slightly. I used my staple gun to attach the pieces that I rolled out and cut with about a 6" overlap.

Next we put in the floor, some sites and how-to books say to use a flooring stapler, but those are expensive (even to rent) and so big that you can only use them on about half the job, since they don't fit in the small spaces. The device itself is about 12x12 total with a mallet activated button on the top which you have to hit to drive the staples. After reading up on it, I decided that a simple finishing nailer would be better for me, it fits into fairly tight spaces if you get creative, and with three or four nails per board, I haven't noticed any signs of looseness.

The first room I finished was Coughlin's, he stayed in our guest bedroom for a couple weeks while we finished his room up.

Here is his finished room looking in the door (you can see Kitty Cow enjoying the new floors).


This is the closet side of the room finished.


And this is the other side of his room.


The next room to work on was the hallway, since all three rooms and the hall will be connecting, I have to go from one job to the next, maintaining contact the whole time. Even if I measured out the spaces perfectly in advance, there would be no way to get the wood to match up as nicely as I have by going from one room to the next without breaking the connection.

The hallway required a lot of small detail work, so it took just about the same amount of time as Coughlin's bedroom. I had to remove the trim on our three bedroom doors, one bathroom door and had to take out entirely the door for the hallway linen closet.

This picture shows one of the heavily detail oriented corners of the hallway, the door to Coughlin's room and the bathroom being just a few inches apart. I had to trim the flooring and the door trim very carefully. You can see the very small gap between the door-frames and the floor where you can see a bit of black tar paper. Those gaps look big in this zoomed in picture, but from a stand in normal light you can't see them at all.


The small 1" trim pieces that go in the corner were pretty beat up, but they are hardly noticeable with normal lighting so I decided to keep them anyway, it was easier than finding and cutting new trim, especially since it wouldn't match.

Here is the view looking into our bedroom. You can see our nasty old carpet with the exposed pad below. It will be coming out soon as part of this project, so we didn't put any effort into making it look nice for the time being.


On the left you can see the edge going into the bathroom. I had to make careful measurements and cuts to get all the pieces to line up perfectly. I will probably get a small wood reducer strip to cover the threshold there, so the wood must be perfectly flush.

This is the view into Coughlin's room from our room. You can see the hallway closet to the left of Coughlin's door.


Here is the view from the living room into the hallway. We still have to work on the guest bedroom on the left.


I turned the last piece sideways so that the floor was held in tighter and it gives me a dividing point where I can change to a different color, stain, size or grain in the living room, since I don't have enough of this birch to do more than our three bedrooms and the hallway.

Hopefully I can find a deal as good as this for the rest of the house so I can do the living room and family room for a low cost.